Computer Vision - Experiment 7 - Find and draw outline experiments

计算机视觉 - 实验七 查找并绘制轮廓实验

Computer Vision - Experiment 7 - Find and draw outline experiments

Experimental objectives and requirements

  Understand the basic principle of finding image contours; master the code writing method of finding contours using OpenCV; master the code writing method of drawing contours using OpenCV.

Experiment content

   (i) New project.

   (ii) Configuring OpenCV in VS2015.

   (iii) Using the findContours function in OpenCV to implement find contours;

   (iv) Use the drawContours function in OpenCV to implement draw contours.

Experimental instruments, equipment

  A computer with Windows 7 operating system and Visual Studio 2015 installed

Experimental principle

   (i) Although an edge detection algorithm like Canny can detect pixels at the boundary of the contours based on the difference between pixels, it does not take the contours as a whole. So, this experiment is to assemble these edge pixels into a contour.

   (ii) A contour generally corresponds to a series of points, which is a curve in the image. Its representation may vary depending on the situation. In OpenCV, the findContours function can be used to find contours from a binary image. drawContours function is used to draw external or internal contours in the image .

Experimental steps

   (i) Create a Visual Studio 2015 console application;

   (ii) Configure OpenCV in Visual Studio 2015;

   (iii) Write code to implement findContours using the findContours function to implement find contours;

   (iv) Write code to implement drawContours using the drawContours function.

Experimental notes

   (i) The method of configuring OpenCV in VS after completing the installation of OpenCV;

   (ii) The functions and usage of the findContours function;

   (iii) The functions and usage of the drawContours function.

Experimental results

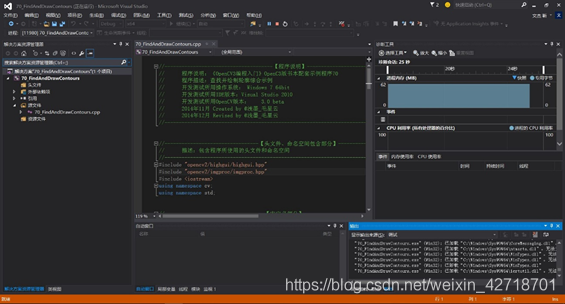
   (i) experimental code
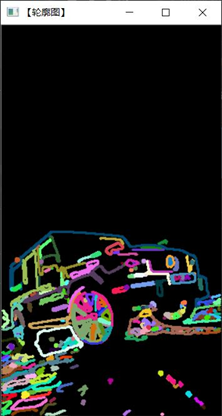
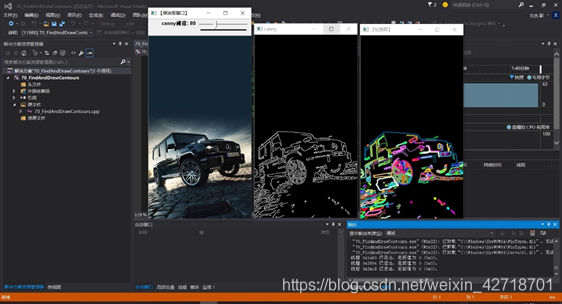
  1
  2
  3
  4
  5
  6
  7
  8
  9
 10
 11
 12
 13
 14
 15
 16
 17
 18
 19
 20
 21
 22
 23
 24
 25
 26
 27
 28
 29
 30
 31
 32
 33
 34
 35
 36
 37
 38
 39
 40
 41
 42
 43
 44
 45
 46
 47
 48
 49
 50
 51
 52
 53
 54
 55
 56
 57
 58
 59
 60
 61
 62
 63
 64
 65
 66
 67
 68
 69
 70
 71
 72
 73
 74
 75
 76
 77
 78
 79
 80
 81
 82
 83
 84
 85
 86
 87
 88
 89
 90
 91
 92
 93
 94
 95
 96
 97
 98
 99
100
101
102
103
104
105
106
107
108
109
110
111
112
113
//----------------------------【头文件、命名空间包含部分】----------------------------
//		描述:包含程序所使用的头文件和命名空间
//-------------------------------------------------------------------------------------
#include "opencv2/highgui/highgui.hpp"
#include "opencv2/imgproc/imgproc.hpp"
#include <iostream>
using namespace cv;
using namespace std;


//----------------------------【宏定义部分】-------------------------------------------- 
//		描述:定义一些辅助宏 
//------------------------------------------------------------------------------------- 
#define WINDOW_NAME1 "【原始图窗口】"			//为窗口标题定义的宏 
#define WINDOW_NAME2 "【轮廓图】"					//为窗口标题定义的宏 


//----------------------------【全局变量声明部分】--------------------------------------
//		描述:全局变量的声明
//-------------------------------------------------------------------------------------
Mat g_srcImage; 
Mat g_grayImage;
int g_nThresh = 80;
int g_nThresh_max = 255;
RNG g_rng(12345);
Mat g_cannyMat_output;
vector<vector<Point>> g_vContours;
vector<Vec4i> g_vHierarchy;


//----------------------------【全局函数声明部分】--------------------------------------
//		描述:全局函数的声明
//-------------------------------------------------------------------------------------
static void ShowHelpText( );
void on_ThreshChange(int, void* );


//---------------------------【main( )函数】--------------------------------------------
//		描述:控制台应用程序的入口函数,我们的程序从这里开始执行
//-------------------------------------------------------------------------------------
int main( int argc, char** argv )
{
	//【0】改变console字体颜色
	system("color 1F"); 

	//【0】显示欢迎和帮助文字
	ShowHelpText( );

	// 加载源图像
	g_srcImage = imread( "1.jpg", 1 );
	if(!g_srcImage.data ) { printf("读取图片错误,请确定目录下是否有imread函数指定的图片存在~! \n"); return false; } 

	// 转成灰度并模糊化降噪
	cvtColor( g_srcImage, g_grayImage, COLOR_BGR2GRAY );
	blur( g_grayImage, g_grayImage, Size(3,3) );

	// 创建窗口
	namedWindow( WINDOW_NAME1, WINDOW_AUTOSIZE );
	imshow( WINDOW_NAME1, g_srcImage );

	//创建滚动条并初始化
	createTrackbar( "canny阈值", WINDOW_NAME1, &g_nThresh, g_nThresh_max, on_ThreshChange );
	on_ThreshChange( 0, 0 );

	waitKey(0);
	return(0);
}

//-----------------------------【on_ThreshChange( )函数】------------------------------  
//      描述:回调函数
//-------------------------------------------------------------------------------------  
void on_ThreshChange(int, void* )
{

	// 用Canny算子检测边缘
	Canny( g_grayImage, g_cannyMat_output, g_nThresh, g_nThresh*2, 3 );
	imshow("canny", g_cannyMat_output);

	// 寻找轮廓
	//void findContours(InputOutputArray image, OutputArrayOfArrays contours,
	//	OutputArray hierarchy, int mode,
	//	int method, Point offset = Point());
	findContours( g_cannyMat_output, g_vContours, g_vHierarchy, RETR_TREE, CHAIN_APPROX_SIMPLE, Point(0, 0) );

	// 绘出轮廓
	Mat drawing = Mat::zeros( g_cannyMat_output.size(), CV_8UC3 );
	for( int i = 0; i< g_vContours.size(); i++ )
	{
		Scalar color = Scalar( g_rng.uniform(0, 255), g_rng.uniform(0,255), g_rng.uniform(0,255) );//任意值
		drawContours( drawing, g_vContours, i, color, 2, 8, g_vHierarchy, 0, Point() );
	}

	// 显示效果图
	imshow( WINDOW_NAME2, drawing );
}


//----------------------------【ShowHelpText( )函数】----------------------------------  
//      描述:输出一些帮助信息  
//-------------------------------------------------------------------------------------  
static void ShowHelpText()  
{  
	//输出欢迎信息和OpenCV版本
	printf("\n\n\t\t\t非常感谢购买《OpenCV3编程入门》一书!\n");
	printf("\n\n\t\t\t此为本书OpenCV3版的第70个配套示例程序\n");
	printf("\n\n\t\t\t   当前使用的OpenCV版本为:" CV_VERSION );
	printf("\n\n  ----------------------------------------------------------------------------\n");
	//输出一些帮助信息  
	printf(   "\n\n\t欢迎来到【在图形中寻找轮廓】示例程序~\n\n");  
	printf(   "\n\n\t按键操作说明: \n\n"  
		"\t\t键盘按键任意键- 退出程序\n\n"  
		"\t\t滑动滚动条-改变阈值\n" );  
}

   (ii) Show results

Find and draw outline experiments 1

Find and draw outline experiments 2

Find and draw outline experiments 3

Find and draw outline experiments 4

Find and draw outline experiments 5

Experiment Summary

  The main content of this experiment is to understand the basic principle of finding image contours; to master the code writing method of using OpenCV to implement find contours; to master the code writing method of using OpenCV to implement draw contours. Create a new project, configure OpenCV in VS2015, and use the findContours function in OpenCV to find contours; use the drawContours function in OpenCV to draw contours. Learn how to find contours from binary images with the findContours function. drawContours function is used to draw external or internal contours in an image.

Built with Hugo
Theme Stack designed by Jimmy